Introduction
iLoveChart Sequence Chart is a web application which generates sequence chart from simple script. With the application, it's efficient to make and maintain sequence charts, especially when you need to make bulk of them. No tedious drawing or fine tuning.
The main task would be to prepare or edit the script. Let's explore how to do that.
First Script - Clock Alarming
In this tutorial, we shall define the sequence for setting clock alarm. First, defines version and category properties:
| 1 | { |
| 2 | version: "1.0", |
| 3 | category: "sequence", |
| 4 | } |
Property version specifies the script language version. Latest version is 1.0.
Property category specifies what kind of script it is for. In this case, it's for sequence chart.
We plan to implement other types of charts in future.
Script consists of a list of properties. A property is defined as:
<property name> : <property value>
Never miss the colon (":") between property name and value. Properties are separated by comma (","). Value of property version and
category are strings - they are enclosed in double-quote marks. Other properties may take set value or
array value. We will meet them later.
There are two objects regarding alarming: user and alarm clock. Let's define them:
| 1 | { |
| 2 | version: "1.0", |
| 3 | category: "sequence", |
| 4 | objects: [ |
| 5 | {id: "user", name: "user"}, |
| 6 | {id: "clock", name: "alarm clock"} |
| 7 | ], |
| 8 | } |
Property objects marks we are defining objects for this sequence chart. Its value is an array, containing definitions for
object. An object has two properties: id and name. Property id uniquely identifies an
element to be displayed in the chart, like an object, or an message. No two elements should have the same
id. The id can be referred by message and style properties. We shall cover more of that in later sections.
Property name specifies the text that will be displayed on the chart representing the object. Both id and name
properties have string value.
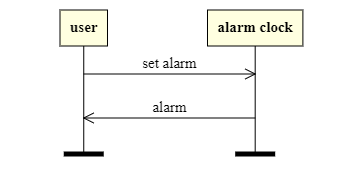
Now let's define how these objects interact.
| 1 | { |
| 2 | version: "1.0", |
| 3 | category: "sequence", |
| 4 | objects: [ |
| 5 | {id: "user", name: "user"}, |
| 6 | {id: "clock", name: "alarm clock"} |
| 7 | ], |
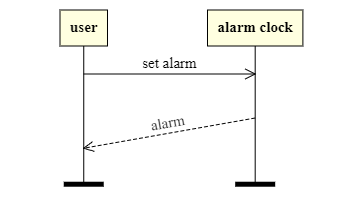
| 8 | messages: [ |
| 9 | {type: "message", from: "user", to: "clock", text: "set alarm"}, |
| 10 | {type: "message", from: "clock", to: "user", text: "alarm"} |
| 11 | ], |
| 12 | } |
Property messages defines all the interactions between objects. Its value is an array of message properties.
In each message property, type indicates message type. Besides message type, we also support other pseudo-message type. We
will explore more of that later. Property from specifies the initiating object's id while to property specifies the
responding object's id. We have seen all these identifiers in the objects property. Property text defines
the message description which shall be displayed on chart.
We have now finished the script for setting clocking alarm. Paste the script into iLoveChart Sequence Chart and generate the sequence chart.
The generated chart should be like this:
Add Other Kind of Messages
As mentioned above, there are other pseudo-message types than message. Let's check them one by one.
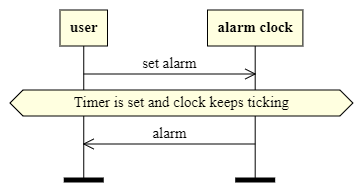
Context
Element context is used to illustrate what context the processing is in now. Here is one example:
| 1 | messages: { |
| 2 | {type: "context", text: "Timer is set and clock keeps ticking"} |
| 3 | } |
The generated chart is:
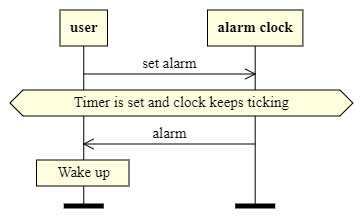
Procedure
Element procedure illustrates some action done by a specific object. An example:
| 1 | messages: { |
| 2 | {type: "procedure", by: "user", text: "Wake up"} |
| 3 | } |
The generated chart is:
The complete script is:
| 1 | { |
| 2 | version: "1.0", |
| 3 | category: "sequence", |
| 4 | objects: [ |
| 5 | {id: "user", name: "user"}, |
| 6 | {id: "clock", name: "alarm clock"} |
| 7 | ], |
| 8 | messages: [ |
| 9 | {type: "message", from: "user", to: "clock", text: "set alarm"}, |
| 10 | {type: "context", text: "Timer is set and clock keeps ticking"}, |
| 11 | {type: "message", from: "clock", to: "user", text: "alarm"} |
| 12 | {type: "procedure", by: "user", text: "Wake up"} |
| 13 | ], |
| 14 | } |
Self Message
A message can be sent from a message to itself. We call it a self message. It looks like this:
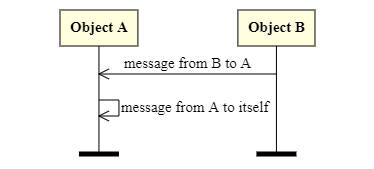
The code is as below. It's actually same as common message, except its from and to are
referring to same object.
| 1 | { |
| 2 | version: "1.0", |
| 3 | category: "sequence", |
| 4 | objects: [ |
| 5 | {id: "objA", name: "Object A"}, |
| 6 | {id: "objB", name: "Object B"} |
| 7 | ], |
| 8 | messages: [ |
| 9 | {type: "message", from: "objB", to: "objA", text: "message from B to A"}, |
| 10 | {type: "message", from: "objA", to: "objA", text:"message from A to itself"} |
| 11 | ], |
| 12 | } |
Comments
Comment starts with !. Any characters after it will be ignored until end of the line. One example:
| 1 | { |
| 2 | version: "1.0", |
| 3 | ! these characters will be ignored |
| 4 | category: "sequence", |
| 5 | } |
Change Styles
If the default styles can meet your requirement, that's great. If not, we can customize them.
For example, if we want to change the object text color to blue and background to light gray, we can add below highlighted lines into the script:
| 1 | { |
| 2 | version: "1.0", |
| 3 | category: "sequence", |
| 4 | objects: [ |
| 5 | {id: "user", name: "user"}, |
| 6 | {id: "clock", name: "alarm clock"} |
| 7 | ], |
| 8 | messages: [ |
| 9 | {type: "message", from: "user", to: "clock", text: "set alarm"}, |
| 10 | {type: "message", from: "clock", to: "user", text: "alarm"} |
| 11 | ], |
| 12 | style: { |
| 13 | object: {color: "blue", background: "lightgray"} |
| 14 | } |
| 15 | } |
You can try it to see what the impact is. We will explore detail in later sections.
Style Rules
Each property in style is called a style rule. We call the property name as selector. The selector defines elements eligible for
this rule. Property value specifies style attributes. In the above example, object is the selector. It means this rule applies to all
object elements.
Four kind of selectors are supported.
Selector - Element Type
This style rule applies to all elements of the specified type. Example :
| 1 | { |
| 2 | style: { |
| 3 | message: {color: "red"} |
| 4 | } |
| 5 | } |
Color of all message elements will be set to red.
These are all the valid element types:
chartobjectmessagecontextprocedure
Selector - All
The style rule applies to all elements. Example:
| 1 | { |
| 2 | style: { |
| 3 | all: {color: "red"} |
| 4 | } |
| 5 | } |
All elements color will be set to red, no matter what their types are.
Selector - Identifier
If selector is prefixed with a hash character ('#'), it represents an id selector. The style rule only applies to the element with specified id. Example:
| 1 | { |
| 2 | objects: [ |
| 3 | {id: "clock", name: "alarm clock"}], |
| 4 | ], |
| 5 | style: { |
| 6 | #clock: {color: "green"} |
| 7 | } |
| 8 | } |
Color of the object whose id is clock will be set to be green. Note that any element can have and id.
Selector - Class
If selector is prefixed with stop character ('.'), it represents a class selector. The style rule only applies to elements with specified class. Example:
| 1 | { |
| 2 | version: "1.0", |
| 3 | category: "sequence", |
| 4 | objects: [ |
| 5 | {id: "user", name: "user"}, |
| 6 | {id: "clock", name: "alarm clock"} |
| 7 | ], |
| 8 | messages: [ |
| 9 | {type: "message", from: "user", to: "clock", text: "set alarm"}, |
| 10 | {type: "message", from:"clock", to: "user", text: "alarm", class: "async"}, |
| 11 | ], |
| 12 | style: { |
| 13 | .async: {ml: "1 dashed open 10"} |
| 14 | } |
| 15 | } |
Message line of messages whose class is "async" shall be dashed and sloppy to simulate asynchronous messages. We will get back to
ml attribute later. Just try it and see how it behaves:
 Class selector can also be prefixed with element type. Then the rule shall apply to elements of the type and class.
Priority of Style Rules
If one element is eligible for multiple style rules, which rule shall take effect if those rules are defining colliding style attributes? We follow these principles to solve potential collision:
- Priority from high to low:
- rule with id selector
- rule with class selector
- rule with element type selector
- rule with all selector
- If two rules have same priority, last defined rule will take effect.
Attributes
Margin
If we want to adjust space between elements, we can customize their margin attribute. For example:
| 1 | { |
| 2 | style: { |
| 3 | object: {margin: "10 20 30 40"} |
| 4 | } |
| 5 | } |
This rule will adjust margin of object elements. Top margin will be 10 pixels, right side be 20 pixels,
bottom 30 pixels and left side 40 pixels. Attribute margin is actually a complex attribute. We can also use
longhand margin-top, margin-right, margin-bottom or margin-left to set
each side margin separately. This has same effect as last example regarding margin configuration:
| 1 | { |
| 2 | style: { |
| 3 | object: {margin-top: "10", |
| 4 | margin-right: "20", |
| 5 | margin-bottom: "30", |
| 6 | margin-left: "40"} |
| 7 | } |
| 5 | } |
Border
To change border style, customize border attribute. One example:
| 1 | { |
| 2 | style: { |
| 3 | object: {border: "5 solid yellow"} |
| 4 | } |
| 5 | } |
This rule will adjust border of object elements to be 5 pixels wide, solid line and yellow color. We can also use longhand attribute
border-width, border-style, border-color to customize border width, style and color separately.
| 1 | { |
| 2 | style: { |
| 3 | object: {border-width: "5", |
| 4 | border-style: "solid", |
| 5 | border-color: "yellow"} |
| 6 | } |
| 7 | } |
Attribute border-style can take these values:
soliddashed
Padding
If we want to adjust padding inside elements, we can customize their padding attribute. One example:
| 1 | { |
| 2 | style: { |
| 3 | object: {padding: "10 20 30 40"} |
| 4 | } |
| 5 | } |
This rule will adjust padding of object elements. Top padding will be 10 pixels, right side be 20 units, bottom 30 units and left side 40 units. We can
also use longhand padding-top, padding-right, padding-bottom or padding-left to set each side padding separately.
Background and Color
Attribute background sets background color of elements while color sets text color. An example:
| 1 | { |
| 2 | style: { |
| 3 | object: {background: "lightpink", color: "yellow"} |
| 4 | } |
| 5 | } |
This rule sets the object elements to be of light pink background and yellow text.
We have already used color name to specify a color value. We can also use function rgb(r, g, b) to specifyc color value. For example:
| 1 | { |
| 2 | style: { |
| 3 | object: {color: "rgb(255, 0, 0)"} |
| 4 | } |
| 5 | } |
In this example, rgb(255, 0, 0) represents red color.
Font
Attribute font is used to adjust font configuration. For example:
| 1 | { |
| 2 | style: { |
| 3 | object: {font: "italic normal 20 Serial"} |
| 4 | } |
| 5 | } |
This rule will set object font size to 20 pixels. Text will be italic and from Serial font family.
We can also use longhand font-style, font-weight, font-size, and font-familyto set font size, weight,
style and family separately.
Attribute font-style can take these value:
normalitalic
Attribute font-weight can take these value:
normalbold
Life Line
Attribute ll is used to adjust life line configuration for chart. For example:
| 1 | { |
| 2 | style: { |
| 3 | chart: {ll: "5 red"} |
| 4 | } |
| 5 | } |
This rule will set life line width to 5 pixels and color to red.
We can also use longhand attributes ll-width and ll-color to set life line width and color separately.
Message Line
Attribute ml is used to adjust message line configuration. For example:
| 1 | { |
| 2 | style: { |
| 3 | message: {ml: "2 dashed open 15"} |
| 4 | } |
| 5 | } |
This rule will set message line attributes:
- width be 2 pixels
- line style be dashed
- line head be open arrow
- line angle is 15 degree
We can also use longhand ml-width, ml-style, ml-head and ml-angle to set message line
width, style, head and angle separately.
Attribute ml-style can take these values:
soliddashed
Attribute ml-head can take these values:
nonesolidopen
Style Attribute Matrix
This table shows what attributes are supported by each element type:
| Chart | Object | Message | Context | Procedure | |
|---|---|---|---|---|---|
| margin | Y | Y | Y | Y | Y |
| padding | Y | Y | Y | Y | Y |
| border | Y | Y | Y | Y | Y |
| font | Y | Y | Y | Y | Y |
| ll | Y | N | N | N | N |
| ml | N | N | Y | N | N |
| background | Y | Y | Y | Y | Y |
| color | Y | Y | Y | Y | Y |
| id | N | Y | Y | Y | Y |
| class | N | Y | Y | Y | Y |
As mentioned below, some attributes can be defined as both longhand or shorthand ones. Below table listed their mappings. The longhand attributes are listed by the order they should appear in the shorthand format:
| Shorthand | Longhand |
|---|---|
| margin | margin-top margin-right margin-bottom margin-right |
| padding | padding-top padding-right padding-bottom padding-right |
| border | border-width border-color |
| font | font-size font-style font-weight font-family |
| ll | ll-width ll-color |
| ml | ml-width ml-style ml-head ml-angle |